After an inside bar appears in gold, why look at the mother bar range first?
Distinguish between the small range of the inside bar and the full range of the mother bar, and use an original schematic to identify fluctuations that remain within the mother bar versus scenarios that truly leave the range.
Author: Thomas | Technical analysis experience | November 8, 2026
Summary: When an inside bar appears on a gold chart, the next bar may quickly move beyond the inside bar's high or low, but price may still remain within the full range of the previous bar. Recording these two layers of boundaries separately can help avoid mistakenly describing local expansion as a breakout of the entire range. This article uses hypothetical charts to illustrate the order of judgment.
First distinguish the inside bar from the mother bar
This article uses a strict definition: the high of the later closed bar is lower than the previous bar's high, and the low is higher than the previous bar's low. The previous bar is called the mother bar, and the later bar is called the inside bar. The comparison uses the highs and lows including wicks. If only the body is contained while the wicks have already exceeded the boundary, it is not counted under the criteria in this article. Cases with equal highs or lows can be labeled separately to help maintain a consistent statistical scope during review.
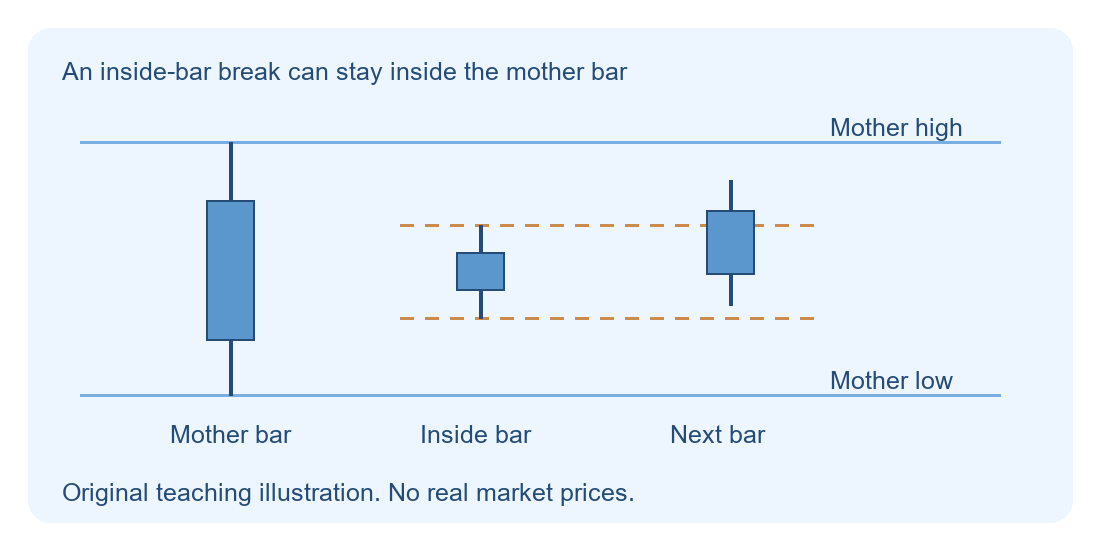
In the figure, the two light blue horizontal lines are the mother bar's high and low, and the orange dashed lines are the inside bar's high and low. The third bar moves above the inside bar's high but remains within the mother bar range. This segment can be recorded as upward expansion of the small range; whether the mother bar boundary can be exceeded still requires subsequent price confirmation. The price action in the figure is an educational illustration and does not use real quotes or account records.
Write both boundaries in the same record
First fix the instrument, quote source, and timeframe, and record the four prices after two bars have closed. Then clearly state which layer of boundary this observation targets. If studying a breakout of the mother bar range, use the mother bar's high and low as the reference. If the next bar only moves outside the inside bar range, record it as internal expansion. Label the two types of events separately so that later you can determine whether you are evaluating the same structure.
For example, assume the mother bar range is 90 to 110, and the inside bar range is 96 to 104. Price then reaches a high of 107 and closes at 105; although it exceeds 104, it is still within the mother bar range. If the next bar touches 112 but closes back at 109, under the pre-selected closing rule, an upside breakout of the mother bar is not yet confirmed. All numbers are educational units. In practice, other confirmation criteria may be chosen, but they should be determined first and then used consistently to record results.
After leaving the range, still observe whether it holds
If the close moves above the upper edge of the mother bar, you can continue to watch whether subsequent pullbacks hold outside the area and whether price can form a higher low. If price quickly returns into the mother bar and breaks below the local low used for confirmation, the original upside continuation assumption should be withdrawn. Downside breakouts can be checked in the same order: first confirm leaving the range, then see whether a rebound can recover it. Waiting for confirmation may miss part of a move and may also make the judgment point farther from the boundary; these costs should be recorded during review.
When the mother bar is too wide, the distance from the boundary to the point where the structure fails may exceed what the plan can bear. Consecutive inside bars may also cause frequent changes of reference; in that case, keep the original mother bar and note the subsequent nesting relationship to avoid mixing boundaries. News periods, widened spreads, or missing quotes reduce chart comparability, so data and execution conditions should be verified first. Even if the pattern meets pre-set conditions, position risk should still be estimated independently.

MT4 EA troubleshooting guides →